Changing a drill bit may seem simple, but many beginners struggle with it. A drill is one of the most useful tools for home and professional projects, so knowing how to switch bits quickly and safely is important. Whether you have a corded or cordless drill, the process is similar, but there are small differences you should know.
This article will help you change a drill bit with confidence. You’ll also find practical advice, common mistakes, and clear comparisons between drill types.
Table of Contents
Why Changing Drill Bits Matters?
Switching drill bits allows you to use your drill for different tasks. You might need a wood bit, a masonry bit, or a screwdriver bit depending on your project. Using the correct bit prevents damage to materials, protects your drill, and makes your work easier. Using the wrong bit can lead to poor results or even safety problems.
Drill bits come in many sizes and types. For example, the diameter of bits can range from 1/16 inch to over 1 inch for large projects. According to manufacturers, using the right bit increases efficiency by up to 30% and reduces wear on the tool.
Types Of Drill Chucks
The chuck is the part of the drill that holds the bit. There are three main types:
| Chuck Type | How It Works | Common Use |
|---|---|---|
| Keyed | Uses a small key to tighten or loosen | Older corded drills, heavy-duty jobs |
| Keyless | Twist by hand to open or close | Modern cordless drills, quick changes |
| Hex | Push-fit, no twisting needed | Impact drivers, fast bit swaps |
Keyed chucks are strong but require a key, which can be lost. Keyless chucks are easy to use but may not hold as tightly for heavy-duty work. Hex chucks are fastest, but only accept hex-shank bits.

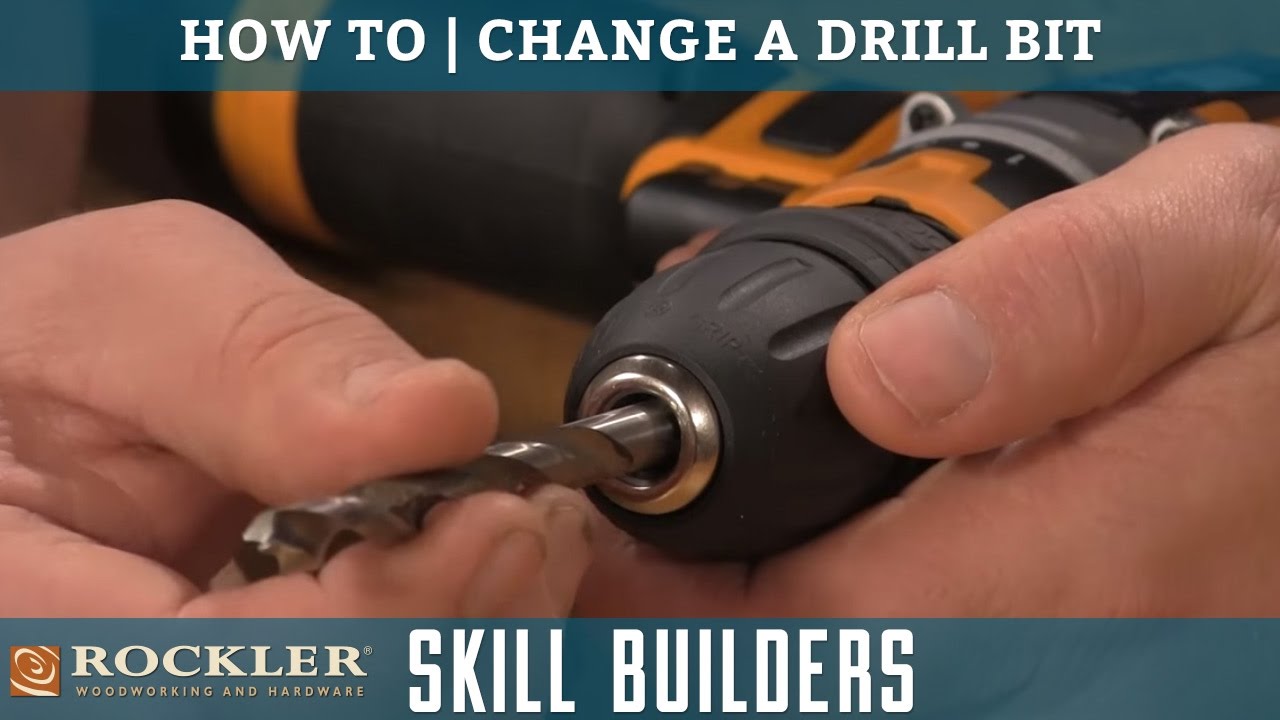
How To Change A Drill Bit: Basic Process
Switching a drill bit involves loosening the chuck, removing the old bit, adding the new one, and tightening. Here’s how to do it:
- Unplug or remove the battery from the drill for safety.
- Open the chuck by turning it counterclockwise. For keyed chucks, use the key. For keyless, twist the sleeve.
- Remove the old bit by pulling it out gently.
- Insert the new bit. Make sure it sits straight in the chuck.
- Tighten the chuck by turning it clockwise or using the key.
- Check the bit by pulling lightly. It should not move.
- Reconnect power and test at low speed.
Taking these steps ensures the bit is secure and your drill is ready for work.
Changing Bits On Keyed Vs Keyless Chucks
The process is similar, but some details matter. Here’s a comparison:
| Chuck Type | Opening | Closing | Tips |
|---|---|---|---|
| Keyed | Insert key, turn left | Insert key, turn right | Always tighten at several points |
| Keyless | Twist sleeve left by hand | Twist sleeve right by hand | Grip with both hands for extra torque |
With keyed chucks, turn the key in each hole around the chuck for even tightening. For keyless chucks, grip the outer sleeve with one hand and the drill with the other to get a firm hold.
Changing Bits On Impact Drivers And Hex Chucks
Impact drivers use hex chucks, which are fast and simple. Here’s how:
- Pull the sleeve on the chuck outward.
- Insert the bit until it clicks.
- Release the sleeve. The bit should lock in place.
- Test the bit by pulling gently.
Hex chucks only fit bits with a hexagonal shank. If you try to use a round-shank bit, it won’t fit.
Safety Tips When Changing Drill Bits
Safety is important. Drill bits can be sharp, and drills are powerful tools.
- Always disconnect power before changing bits.
- Wear gloves if the bit is hot or dirty.
- Hold the drill steady to avoid dropping it.
- Make sure the bit is fully seated in the chuck.
- Never force a bit that doesn’t fit.
According to the US Consumer Product Safety Commission, over 20,000 injuries related to power tools are reported each year. Many happen because people rush or skip safety steps.
Common Mistakes Beginners Make
Here are some typical errors and how to avoid them:
- Not tightening the chuck enough. This causes the bit to slip or wobble.
- Using the wrong bit for the material. For example, a wood bit in metal can break.
- Leaving debris in the chuck. Always clean before inserting a new bit.
- Forgetting to remove the key from a keyed chuck. Running the drill with the key in place is dangerous.
- Trying to fit a round bit in a hex chuck. Only hex bits work.
Many beginners overlook cleaning the chuck. Dust and dirt can make bits fit poorly.
Choosing The Right Drill Bit
Picking the right bit is crucial for good results. Drill bits come in many shapes and materials. Here’s a simple comparison:
| Bit Type | Material | Use |
|---|---|---|
| Twist | High-speed steel | Wood, plastic, metal |
| Masonry | Tungsten carbide | Brick, stone, concrete |
| Spade | Carbon steel | Large holes in wood |
| Forstner | Steel, carbide | Flat-bottom holes in wood |
| Driver | Hardened steel | Screws and fasteners |
Always check the bit for wear or damage. A dull or bent bit can ruin your project.
Practical Tips For Changing Drill Bits
Some advice can save you trouble:
- Keep the chuck clean. Dust or metal shavings can affect grip.
- Store your drill bits in a case to prevent loss or damage.
- Lubricate the chuck if it’s hard to turn.
- If the chuck jams, reverse the drill at low speed to loosen it.
- For tight bits, use a rubber grip or pliers (with care).
These tips help your drill last longer and make bit changes faster.
When To Replace Your Drill Bit?
You should replace bits when they:
- Become dull or worn out.
- Have visible bends or cracks.
- Produce smoke or excessive heat during use.
- Leave rough holes or tear material.
Experts recommend checking bits every few hours of use. According to tool makers, using sharp bits increases speed and accuracy by up to 25%.
How Often Should You Change Bits?
Change bits whenever your task changes or the bit becomes worn. For example:
- Drilling through different materials (wood, then metal).
- Switching from drilling to screwing.
- When the bit slips or does not cut well.
Some professionals change bits several times per hour. For home use, you may only switch bits a few times per project.
Troubleshooting Drill Bit Problems
If you have trouble changing a bit:
- The chuck won’t open: Apply a small amount of oil and try again.
- The bit is stuck: Use pliers gently, but don’t damage the chuck.
- The bit wobbles: Remove and reinsert, making sure it is centered.
- The chuck key is lost: Replacement keys are available at hardware stores.
Sometimes, the chuck won’t grip. This can happen if the jaws are dirty or damaged. Clean and inspect regularly.

Comparing Corded And Cordless Drills For Bit Changes
Both types work similarly, but there are differences:
- Corded drills usually have keyed chucks. They are strong and durable.
- Cordless drills often use keyless chucks. They are lighter and easier to use.
Cordless drills are more popular now. According to industry reports, over 65% of drills sold in the US are cordless.
Maintaining Your Drill And Bits
Proper care keeps your drill working well:
- Clean the chuck and bits after each use.
- Store in a dry place to prevent rust.
- Check for loose parts or damage.
- Lubricate moving parts every few months.
A well-maintained drill can last 10 years or more. Bits should be replaced as needed.
Advanced Tips For Faster Bit Changes
If you want to speed up bit changes:
- Use a quick-change chuck or adapter.
- Keep bits organized by size and type.
- Practice using both hands to twist keyless chucks.
- For repetitive jobs, use a second drill with a different bit.
Professional builders often carry several drills to avoid constant switching.
The Importance Of Using The Right Chuck Key
For keyed chucks, the key is essential. Using the wrong size can damage the chuck. Always check the key matches your drill. If you lose the key, buy a replacement from a reputable store.
Environmental Factors Affecting Bit Changes
Humidity, dust, and temperature can affect your drill and bits. In humid areas, bits can rust. In dusty places, the chuck can jam. Keep tools clean and dry.
Real-world Example: Home Repair
Suppose you need to drill a hole in drywall to hang a picture frame. You would:
- Remove the battery.
- Open the chuck.
- Insert a twist bit for drywall.
- Tighten the chuck.
- Replace the battery and drill the hole.
Afterward, switch to a driver bit to install the screw.
Frequently Asked Questions
How Do I Know Which Drill Bit To Use?
Choose based on the material. Use masonry bits for stone or concrete, wood bits for timber, and metal bits for steel or aluminum. Always check the bit label.
Can I Use A Drill Bit In An Impact Driver?
Only hex-shank bits fit impact drivers. Round bits won’t lock in place. Impact drivers are best for screws and bolts.
What If My Drill Bit Gets Stuck?
Try reversing the drill at low speed. If that fails, use pliers gently. Avoid forcing, as it may damage the chuck.
How Tight Should I Make The Chuck?
Tighten until the bit does not move when pulled. For keyed chucks, use all holes for even grip. Too loose, and the bit slips; too tight, and you might damage the bit.
Lastly
Changing a drill bit is a basic skill, but doing it well makes your work easier and safer. With the right chuck type, proper bit selection, and careful handling, you can switch bits quickly and avoid common problems. Practice these techniques, and your drill will serve you well for years.
Leave a Reply