Using a hand planer can change the way you work with wood. This simple tool helps you smooth, shape, and adjust boards by removing thin layers. For beginners, the process may seem tricky, but once you know the right way, a hand planer becomes one of the most useful tools in your workshop.
This article guides you through everything you need to know about using a hand planer—how it works, choosing the right one, preparing your workspace, using it safely, and avoiding common mistakes. Whether you want to level a door, fix an uneven tabletop, or make a board fit perfectly, you’ll find clear advice and practical tips here.
Table of Contents
What Is A Hand Planer?
A hand planer is a woodworking tool that shaves off thin layers from wood surfaces. It has a sharp blade set in a flat body, with handles for control. You push the planer across the wood, and the blade slices off curls or shavings. This tool helps you:
- Smooth rough surfaces
- Adjust thickness
- Trim edges
- Remove paint or finish
Most hand planers are made from steel and wood, and they come in different types. Each has unique strengths for various jobs.
| Type | Best For | Blade Width |
|---|---|---|
| Block Planer | Small details, end grain | 1.5 – 2 inches |
| Jack Planer | General smoothing, leveling | 2 – 2.5 inches |
| Jointer Planer | Long boards, jointing edges | 2.5 – 3 inches |
| Rabbet Planer | Cutting grooves | Varies |
Choosing The Right Hand Planer
Picking the correct hand planer makes your work easier and more accurate. There are several factors to consider:
- Type of Woodwork: For small, detailed jobs, a block planer is best. For leveling or smoothing large boards, a jack or jointer planer works better.
- Blade Quality: Choose a planer with a high-carbon steel blade. These blades stay sharp longer and cut smoothly.
- Body Material: Metal bodies are durable and stable. Wooden bodies are lighter and glide easily.
- Adjustability: Good planers allow you to adjust the blade depth. This feature is important for controlling how much wood you remove with each pass.
- Handle Comfort: Handles should feel comfortable and secure. If you plan to use the tool for long periods, handle shape matters.
Many beginners make the mistake of buying a cheap planer with a dull blade or poor adjustment. This leads to rough results and frustration. It’s better to spend a bit more for a quality tool that lasts.
| Feature | Budget Planer | High-Quality Planer |
|---|---|---|
| Blade Material | Low-carbon steel | High-carbon steel |
| Adjustment Mechanism | Basic | Precise, easy |
| Handle Comfort | Plastic, basic | Ergonomic, wood/metal |
| Durability | Short-lived | Long-lasting |
Preparing Your Workspace
A safe, organized workspace is essential. This helps you work comfortably and avoid accidents.
- Stable Workbench: Use a strong bench that doesn’t move. Clamp your wood firmly so it won’t slip.
- Clean Area: Remove dust, scraps, and tools from your bench. Shavings can be slippery and hide hazards.
- Lighting: Good lighting lets you see the surface, blade angle, and any defects.
- Safety Gear: Wear safety glasses to protect your eyes from flying shavings. If you have sensitive skin, wear gloves.
One overlooked tip: always check for nails or screws in your wood. Metal can damage your planer’s blade instantly.
Setting Up The Hand Planer
Before you begin, your hand planer needs to be properly set up. These steps make sure the blade cuts cleanly and the tool is safe.
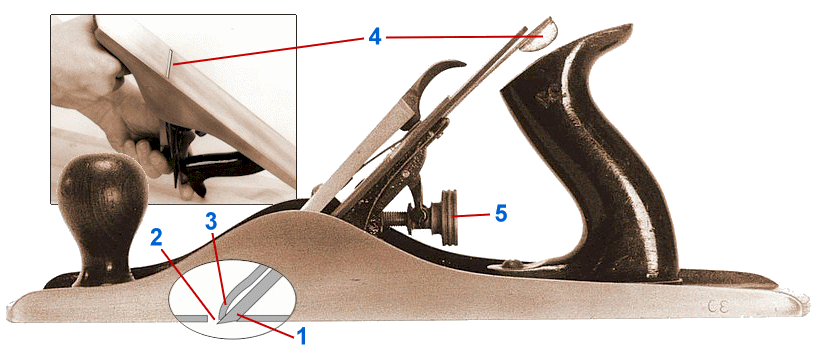
- Blade Sharpening: A sharp blade is key. Use a sharpening stone or file. Hold the blade at a 25–30 degree angle and rub until sharp. Dull blades tear the wood instead of cutting.
- Blade Depth Adjustment: Adjust the blade so it barely sticks out from the bottom. For rough work, set it deeper; for fine smoothing, make it shallow.
- Blade Alignment: Make sure the blade is parallel to the sole (the bottom). Uneven blades leave ridges.
- Tighten Screws: Check that all screws and knobs are tight. Loose parts cause vibration and poor results.
- Lubricate the Sole: Rubbing a bit of paraffin wax or candle on the sole helps the planer slide smoothly.
Many beginners skip sharpening or fail to check alignment, causing rough surfaces and extra effort.
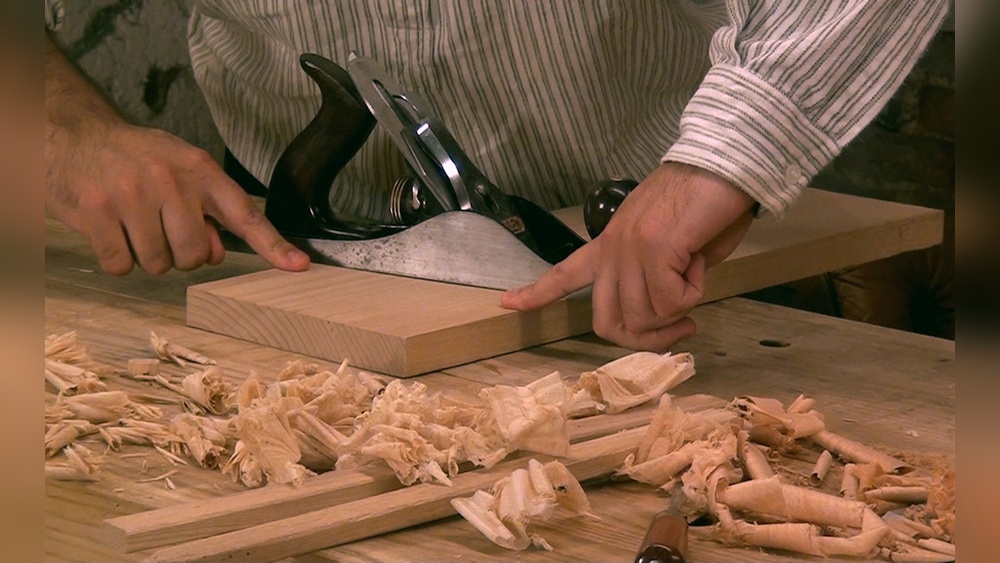
Using A Hand Planer: Basic Technique
Using a hand planer is mostly about control and consistency. Here’s how to use one correctly:
- Grip: Hold the front knob or handle with one hand, and the rear handle with your other hand. Keep your arms steady.
- Starting Position: Place the planer at the edge of the wood, with the blade just touching the surface.
- Push Forward: Use even pressure as you push. Don’t force the planer—let the blade do the work. The motion should be smooth.
- Full Passes: Try to cover the entire length of the board in one pass. This avoids dips and uneven spots.
- Check Your Progress: Look at the shavings. They should be thin and curled. Thick shavings mean the blade is too deep.
- Repeat: Continue passes until the surface is smooth and even.
For large boards, start with diagonal passes, then finish with passes along the grain. This removes bumps and makes the surface flat.
Advanced Tips For Better Results
Experienced woodworkers use several tricks to improve their results:
- Mark High Spots: Use a pencil to lightly mark rough areas. Plane until the marks disappear.
- Check Flatness: Use a straightedge or ruler to check if the board is flat. Adjust your passes if you see gaps.
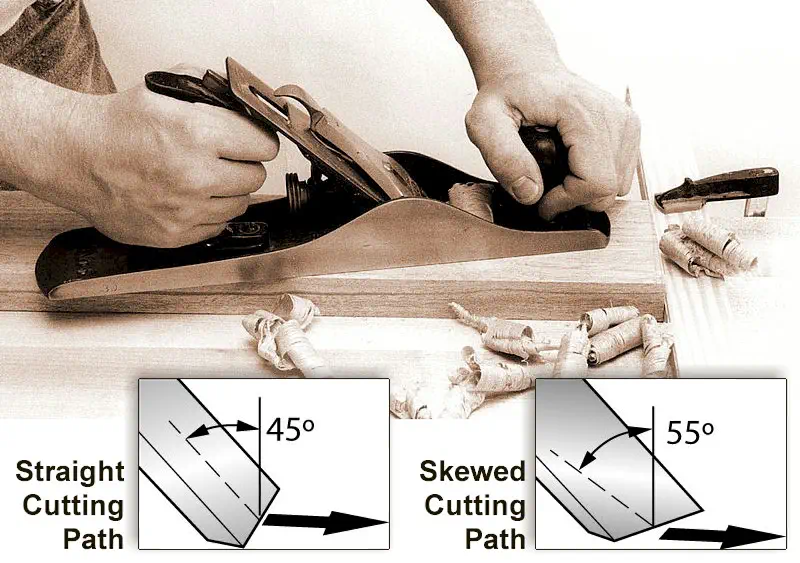
- Work With the Grain: Always move the planer along the wood grain. Going against the grain causes tear-out and roughness.
- Avoid Over-Planing: Stop when the surface feels smooth. Too many passes can make boards too thin.
- Use Two Hands: One hand guides, the other applies steady pressure. This prevents tilting and uneven cuts.
One insight: humidity affects wood and the planer’s performance. Wood expands or contracts, so check before making final cuts, especially for projects that need precision.
Common Mistakes And How To Fix Them
Even skilled workers make errors. Here are frequent mistakes and ways to fix them:
- Uneven Surface: Usually caused by tilted planer or uneven blade. Check blade alignment, and practice keeping your arms steady.
- Tear-Out: Happens when you cut against the grain or use a dull blade. Sharpen the blade and always work with the grain.
- Blade Clogs: If shavings jam inside, clear them out. Keep the blade sharp and set at the correct depth.
- Skipping Sharpening: A blunt blade makes the work harder and ruins the finish. Sharpen before every use.
One non-obvious mistake: pressing too hard creates dips, not smooth surfaces. Use light, steady pressure. Beginners often forget to check their blade depth after each pass—it can shift and change your results.
Using A Hand Planer For Specific Projects
Hand planers work well for many woodworking tasks. Here are some common uses:
- Door Adjustment: If a door sticks, you can shave a bit off the edge. Remove the door, clamp it, and use the planer along the trouble spot.
- Tabletop Leveling: Uneven tabletops are fixed with long, smooth passes. Mark high spots and plane until level.
- Edge Smoothing: Rough edges on boards are easily cleaned up. Use shallow blade depth for clean results.
For fine finishing, sand after planing for a smooth touch. When working on painted or finished wood, check if the planer blade can handle the coating. Some coatings dull blades quickly.
Maintaining Your Hand Planer
Maintenance keeps your planer working well for years. Here’s what you should do:
- Clean After Use: Wipe off shavings and dust. Use a brush to reach inside.
- Blade Care: Sharpen regularly. Remove the blade and store it dry to prevent rust.
- Lubricate Moving Parts: Oil screws and adjustment knobs for smooth action.
- Store Properly: Keep your planer in a dry, safe place. Moisture causes rust and wood swelling.
A good habit is to keep a small kit for sharpening and cleaning close to your workspace. This saves time and helps you fix problems quickly.
Safety Tips
Safety is important with any tool. Follow these tips:
- Wear Eye Protection: Shavings can fly into your eyes.
- Watch Your Fingers: Keep hands away from the blade.
- Check Wood for Metal: Nails or screws can damage the blade or cause injury.
- Work Slowly: Rushing can lead to mistakes and accidents.
- Store Safely: When not in use, cover the blade and store the planer out of reach of children.
Most accidents happen when people rush or don’t check their wood for hidden metal. Always take a moment to inspect before starting.

Frequently Asked Questions
How Often Should I Sharpen The Hand Planer Blade?
Sharpen the blade every time you notice rough shavings or hard pushing. For regular use, sharpening once a week is common. A sharp blade saves effort and improves results.
Can I Use A Hand Planer On Plywood?
Yes, but use shallow passes. Plywood is made from layers, and deep cuts can tear out sections. For best results, go slowly and check your progress often.
What’s The Difference Between A Hand Planer And An Electric Planer?
A hand planer offers more control for fine work. An electric planer is faster and better for large jobs. Electric planers can remove more wood quickly, but they are louder and require more safety precautions. For detailed or small projects, a hand planer is usually better.
How Can I Avoid Tear-out When Planing?
Always move the planer along the wood grain. Use a sharp blade and take light passes. If you see tear-out, reduce blade depth and slow down. Some woods are more prone to tear-out, so extra care is needed.
Last Word
Using a hand planer can be simple and rewarding. With careful setup, steady technique, and regular maintenance, you’ll achieve smooth, precise results on all your woodworking projects. The more you practice, the easier it becomes—and the quality of your finished pieces will show the difference.
Leave a Reply